/
Mac Mail Convert from POP to Exchange
Mac Mail Convert from POP to Exchange
- Former user (Deleted)
Owned by Former user (Deleted)
Last updated: Dec 19, 2017
Wayne Chen updated September 30, 2014 at 3:24 PM
About this Method
This method details the procedure for converting POP accounts to Exchange on Mail.app.
I. Preparation: Before converting
- Find an external hard drive. This will be used to store a copy of the user's email separate from the user's local computer. If hard drive is known to be okay, move on to step II. If not, continue.
- In Disk Utility, select the external hard drive in the list in the left-hand box.
- Click Verify Disk.
- If disk needs to be repaired, Repair Disk.
- Click Verify Disk again. If there are still errors, repair and verify again. If there are still errors, use a different external hard drive and label the bad one as "Bad" and follow procedure to recover its data (outside the scope of this wiki).
- Label the hard drive as "Email backups: Good" with a Post-It for future reference.
- Create a partition on the hard drive called "Email backups." This partition will store the email backup. If the partition already exists, skip this step.
- Make sure the partition has enough space (~70GB). If not, use a different hard drive and repeat steps 1-7.
- Finally, grab a 10.5 or 10.6 CD, depending on which version the user has. This will be needed in case you need to repair the local hard drive on the user's computer.
II. Verify that the existing account on Mail.app is a POP account
- Open Mail.app
- Go to Mail>Preferences>Accounts and verify that the account is running the POP protocol in the lefthand window.
- If the Mail.app is running IMAP or Exchange and has POP inactivated, then your work is done. Do not delete the inactive POP account, as it could destroy the reply links (an arrow button on the left of an email).
III. Verify the disk on the user's computer
- Open Disk Utility and select the local hard drive in the list in the left-hand box
- Click Verify Disk
- If disk is okay, move on to step IV
- If Disk needs to be repaired, restart and boot from CD (hold down C before the startup chime).
- Open Disk Utility from the pull-down menu on the top of the screen
- Click Verify Disk, and then Repair Disk
- If there are still errors, repair and verify again. If there are still errors again, it's a bad hard drive and the data needs to be backed up as soon as possible.
IV. Create copies of Mail and Mail Downloads (if applicable) folders
The Mail and Mail Downloads folder contains emails and email attachments, respectively. You should create a copy as a backup.
- Click Get Mail to download user's most recent emails.
- Open Finder
- Go to ~/Library and find the Mail and Mail Downloads (if applicable) folders.
- Create duplicates (Apple+D on keyboard)
- Hook up the external hard drive. In the "Email Backups" partition, create a folder named "User-YYYYMMDD." Copy and paste the user's Mail copy and Mail Downloads copy folders into this folder.
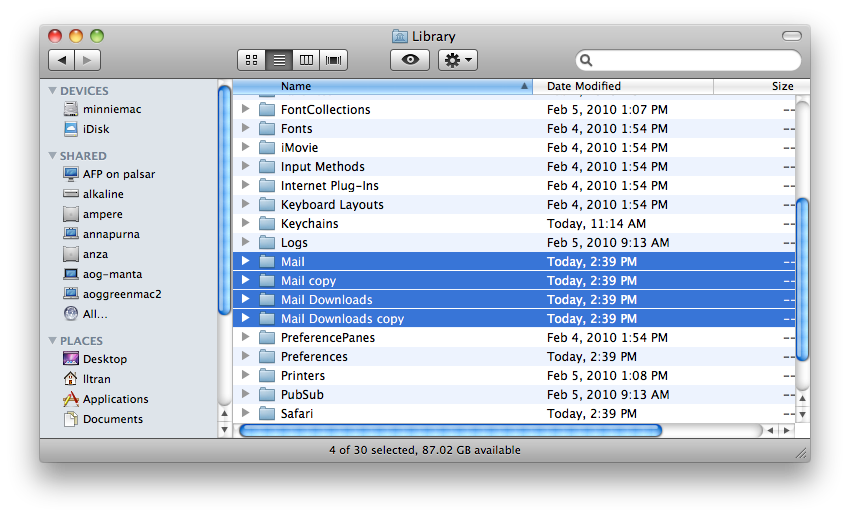
The end result on the user's local hard drive should look like this:
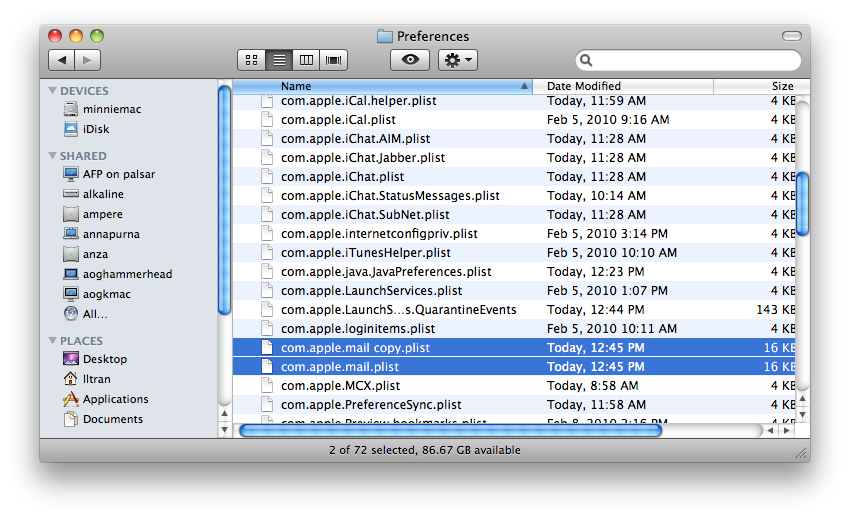
V. Create copies of com.apple.mail.plist
- Go to ~/Library/Preferences/com.apple.mail.plist
- Create a duplicate (Apple+D on keyboard)
- Copy and paste the com.apple.mail.copy.plist file into the "User-YYYYMMDD" folder on the external hard drive.
- Exit finder
VI. Create local mailboxes of the Inbox, Sent and Draft folders on Mail.app
- Click Mailbox>New Mailbox.
- Create 3 local mailboxes located "On my Mac" named "Inbox from POP", "Sent From POP" and "Draft from POP".
- Go back to the Inbox and select all emails (Apple+A).
- Go to Message>Move to>Inbox from POP to transfer all inbox emails to the local inbox folder.
- Repeat steps 3-4 for Sent and Draft emails if applicable.
VII. Flush emails from server and disable POP account
- Click on the Advanced tab in the Mail>Preferences>Accounts window
- Under Remove copy from server after retrieving a message, click Remove now.
- Uncheck Enable this account.
VIII. Create Exchange account
- Click the + sign on the left hand side to create a new account.
- Have user enter email and password. Press Continue. Make sure the account create is an Exchange 2007 account. NOTE: If it searches for longer than 10 seconds just cancel and press Continue. The users email address may need to be entered as username@mail.ucsd.edu
- Take account online.
- Select messages within INBOX from POP, SENT from POP and Drafts from POP mailboxes and use the Copy To command to copy them to the appropriate folders in the exchange mailbox (this will take some time). The copy to command is found under the Message menu.
IX. Final steps
- Once you've verified that everything looks okay, delete the "User-YYYYMMDD" folder on the external hard drive.
- Create a dated folder ~/NOBACKUP/mailBackup-YYYYMMDD
- Move Mail copy and Mail Downloads copy (found in ~/Library), and com.apple.mail copy.plist to this folder
- Follow up with customer in a week and if everything is okay, delete the backup files on the local hard drive (create a ticket as a reminder).
- Go into Mail.app and delete the INBOX from POP, SENT from POP and Drafts from POP mailboxes containing the imported emails from INBOX, Sent Messages and Drafts.
If you need further assistance, please contact IGPP Net Ops.
, multiple selections available,
Related content
How to Move Mail to Local Mailbox
How to Move Mail to Local Mailbox
More like this
Campus Upgrade from Exchange 2007 to Exchange 2010
Campus Upgrade from Exchange 2007 to Exchange 2010
More like this
Configuring Email
Configuring Email
More like this