/
Google Services Setup
Google Services Setup
- Former user (Deleted)
Owned by Former user (Deleted)
Dec 15, 2017
Purpose: To provide step-by-step instructions for setting up UCSD Google Mail (Gmail), UCSD Google Calendar, UCSD Google Contacts on macOS.
Step 1: Enable IMAP
You can retrieve your Gmail messages with a client or device that supports IMAP, like Microsoft Outlook or Apple Mail.
- Sign in to https://gmail.com
- Click the gear in the top right
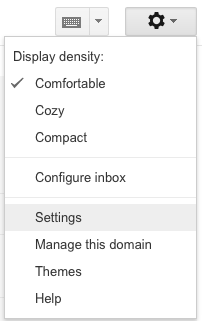
- Select Settings.
- Click Forwarding and POP/IMAP.
- Select Enable IMAP.
- Click Save Changes.
Step 2: Set up your client
Determine your machines OS X
- Go to Apple Menu > About This Mac.
- Take note of the OS version.
OSX 10.12 (Sierra) or 10.11 (El Capitan):
- Go to Mail > Accounts.
- Select Google for account type.
- Sign in with full email address (i.e. username@ucsd.edu).
- Provide AD password.
- Select the apps you want to use with this account (i.e. Mail, Contacts, Calendars). Uncheck the unneeded apps (i.e. Messages, Notes).
- Click Details...
- Change Description field to UCSD Google or other identifying name
10.10 (Yosemite):
- Select Add Other Account.
- Select Add a Mail account.
- Click Create...
- Add a Mail Account:
- Enter Full Name.
- Enter full email address (i.e. username@ucsd.edu).
- Enter AD (Active Directory) password.
- If Account must be manually configured appears, click on Next.
- Incoming Mail Server Info:
- Account Type: IMAP
- Mail Server: imap.gmail.com
- User Name: full email address (i.e. username@ucsd.edu).
- Password: AD password.
- Click Next (may receive message "Additional account information required").
- May encounter a secondary window asking for Path Prefix, Port, and Authentication information:
- Path Prefix: Leave blank.
- Port: 993, Use SSL.
- Authentication: Password.
- Click Next.
- Outgoing Mail Server Info:
- SMTP Server: smtp.gmail.com.
- User Name: full email address (i.e. username@ucsd.edu).
- Password: AD Password.
- Click Create.
- May encounter separate window popup to authenticate to Google account again. Provide AD password again.
- Name account
- In Internet Accounts window, select newly created account in the left pane
- Click Details...
- Change Description to UCSD Google or other identifying name
Add Calendar and/or Contacts:
- In Internet Accounts window, select newly created account in the left pane.
- Check the boxes for Contacts and Calendars. They check boxes may turn to spinning wheel. Don't need to wait for spinning wheel to stop.
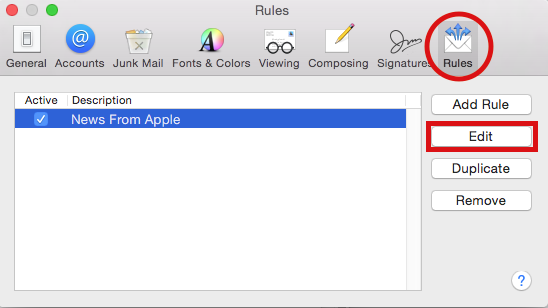
- Filters: If you have any filters they will still be pointing to your old exchange folders and need to be changed to point to your new google account folders
- Navigate to Mail > Preferences > Rules
- Select the filter you would like to change and redirect it to your google account
- OPTIONAL: If user has an alias they would like to use as their visible email address in outgoing messages:
- Go to Mail > Preferences > Accounts.
- Select account in the left pane.
- Change email address field to alias email address (i.e. alias@ucsd.edu).
- While in Gmail web interface, add in any campus alias addresses to the Gmail Settings > Accounts > "Send mail as" area. This allows the Gmail account to receive messages sent from Mail.

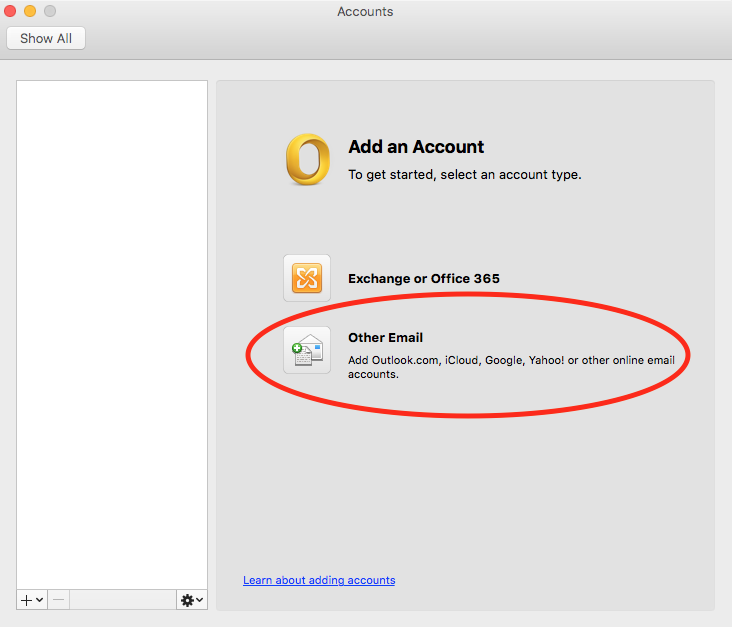
Microsoft Outlook Setup
- Go to Outlook > Preferences
- Select Other Email
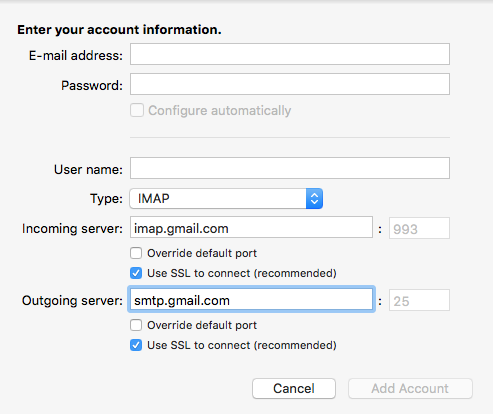
- Enter your account information
- E-mail address: username@ucsd.edu
- Password: Active Directory (AD)
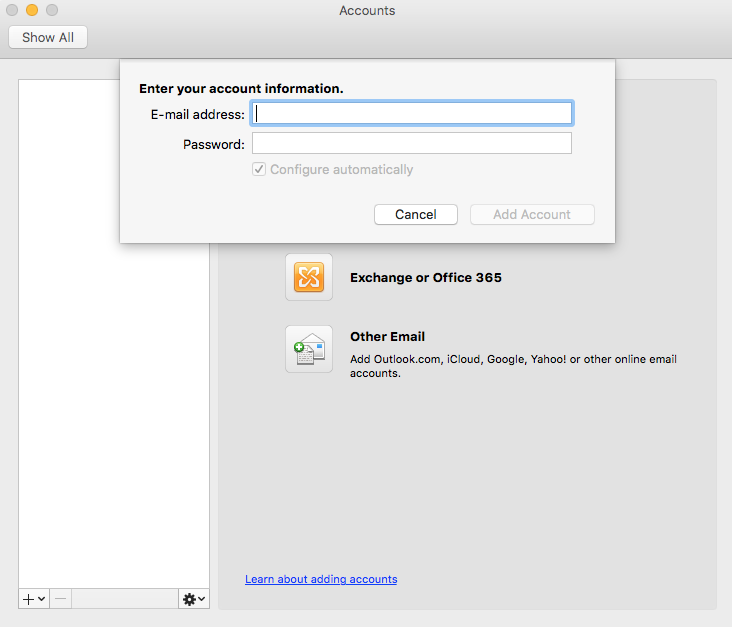
- User name: username@ucsd.edu
- Type: IMAP
- Incoming server: imap.gmail.com
- Use SSL to connect (recommended)
- Outgoing Server: smtp.gmail.com
 Use SSL to connect (recommended)
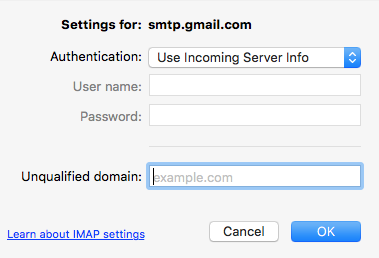
- More Options...
- Authentication: Use Incoming Server Info
Google Account Delegation
- https://support.google.com/mail/answer/138350?hl=en
- Google Settings tabs visible:
- General
- Labels
- Inbox
- Filters and Blocked Addresses
- Forwarding and POP/IMAP
- Offline
- Be aware:
- No granularity of settings changes.
- No notification to account owner of settings changes.
- Providing delegate access also provides delegate to setup a forwarding address, which could be a security concern.
, multiple selections available,